Pinterest meta tag

Showing posts with label Cleaning. Show all posts

Monday, July 28, 2014

Amy: Home Management Makeover


The transition back into the home after working for the last 4 years has been different.  For the first few weeks it felt like a vacation.  Staying in my sweat pants all day, snuggling my son, spending quality time with my daughter, and enjoying naps during the day.  But a vacation can only last so long before the work starts to pile up, and in my case, it really did!

In the months leading up to my son's birth, I had done a lot of reading about home-management and tips for creating and maintaining an organized and healthy household.  We're making a lot of changes and are about to make a lot more.  Not only is our house getting an overhaul, so is our family.  Below is my plan to a healthy family and home, I call it my Home Management Makeover.  I put all the info into my Home management binder (Click HERE for Melody's Post on making your own Home Management Binder!)

  • Step One: PURGE
    • Take the time to go through all the clutter in your home and ditch anything you don't need, don't have room for, or don't need.
      • PROTIP: Take all the clothes hanging in your closet and hang the hangers backwards.  When you wear a garment, hang it back up facing the correct way.  At the end of a year go through and purge anything that's still hanging backwards.
  • Step Two: ORGANIZE
    • Make sure that everything has it's place.  If it doesn't have a place, make one.
      • PROTIP: Clear Shoebox containers are only $1.00 at target and make a great container to organize small toys, craft and art supplies, etc.
  • Step three: CLEAN
    • Getting everything in your home clean.  A clean home is a happy home!
      • PROTIP: Try a cleaning plan.  Clean your house in cycles, aside from the small things that need to be done every day or once a week (dishes, laundry, vacuuming, etc.) things like scrubbing finger prints off the walls, cleaning baseboards, and cleaning ceiling fan blades usually only need to be done in a 2-3 month cycle.  Divide your house into 8-12 Zones or sections (e.g. Kitchen, Bathroom, Living room, etc.) chose one zone for each week.  For each zone, break down that zone into seven separate areas to do one small area each day (you can also break it down to a smaller number to give yourself days off during the week.


MY CLEANING PLAN

  • Zone 1/Week One: Living Room
    • Area 1/Monday: Cat's Corner (where we keep our cat-tree, cat beds, and the cats' toys)
    • Area 2/Tuesday: Entertainment center
    • Area 3/Wednesday: Bookshelf
    • Area 4/Thursday: Kari-Lynn's Nook (a space under our stairs where our daughter keeps her toys.)
    • Area 5/Friday: Couches/Behind the couch
    • Weekend Off
  • Zone 2/Week Two: Kitchen
    • Area 1/Monday: Cabinets
    • Area 2/Tuesday: Drawer
    • Area 3/Wednesday: Stove/Oven/Microwave
    • Area 4/Thursday: Fridge/freezer
    • Area 5/Friday: Sink and counters
    • Weekend Off
  • Zone 3/Week Three: downstairs Bathroom
    • Area 1/Monday: Catbox
    • Area 2/Tuesday: Sink 
    • Area 3/Wednesday: Mirrors
    • Area 4/Thursday: Toilet
    • Three Day weekend!
  • Zone 4/Week Four:Stairs and Upstairs Hallway
    • Area 1/Monday: Stairs Landing
    • Area 2/Tuesday: Stairwell
    • Area 3/Wednesday: Bookshelf in hallway
    • Area 4/Thursday: Wall of Fame (we use the walls in our hallway to display Kari-Lynn's Awards, achievements, and artwork along with chore lists, calendars, and family business.)
    • Three Day Weekend!
  • Zone 5/Week Five: Upstairs Bathroom
    • Area 1/Monday: Vanity
    • Area 2/Tuesday: Cabinet
    • Area 3/Wednesday: Shower/Tub
    • Area 4/Thursday: Floors/Walls
    • Area 5/Friday: Toilet
    • Weekend Off
  • Zone 6/Week Six: Kari-Lynn's Room
    • Area 1/Monday: Closet/Dresser
    • Area 2/Tuesday: Barbie Corner
    • Area 3/Wednesday: Under the bed
    • Area 4/Thursday: Bookshelf
    • Area 5/Friday: desk/behind the door
    • Weekend Off
  • Zone 7Week Seven: Andrew's Room
    • Area 1/Monday: Dresser
    • Area 2/Tuesday: Changing Table
    • Area 3/Wednesday: Shelf
    • Area 4/Thursday: closet
    • Three Day Weekend!
  • Zone 8/Week Eight: My Room 
    • Area 1/Monday: Closet
    • Area 2/Tuesday: Desk
    • Area 3/Wednesday: Nightstand
    • Area 4/Thursday: Bed Drawers
    • Three Day Weekend

 So there you have it, how I manage my happy healthy home.  How do you manage your home?  Do you keep a home management binder?  I'd love to hear your tips on how you run your home!

Check out our other post that Melody made about her Household Management book!

Wednesday, December 18, 2013

Homemade laundry detergent!

Well I FINALLY ran out of detergent so I can try this!

Its really easy and super cheap. If you're broke, just go green!

This page shows the following breakdown of prices:


  • Arm & Hammer® liquid 100 ounce detergent – $6.79 – 32 loads = $0.21 per load
  • Tide® with Bleach powder 267 ounce detergent – $20.32 – 95 loads = $0.21 per load
  •  Homemade powder 32 ounce detergent – $2.98 – 64 loads = $0.05 per load
  • As you can see, whether I compare against traditional store bought liquid or powder, I am saving $0.16 per load!

    So heres how to do it:

    Youll need:

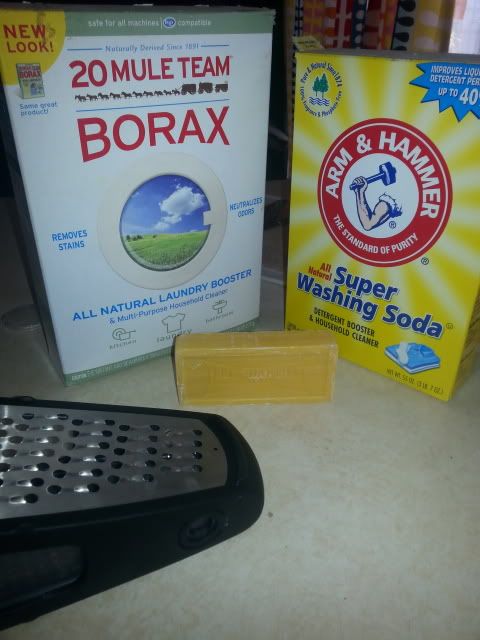
    • 1 bar of Fels-Naptha soap
    • 1/2 cup Borax 
    • 1 cup Washing soda
    • approx. 3-4 gallons of Water
    • A bucket that holds about 4 or more gallons. Preferably with a lid.
    • Your favorite Essential oil (optional)
    1. Put about 4 cups of water on the stove to boil.
    2. While waiting for that to boil grate the bar soap.
    3. When the water boils throw the soap in a little at a time so it breaks down. Stir until fully dissolved
    4. Put about 3 gallons of water into the bucket. You can also add the optional essential oil at this point for extra cleaning or fragrance! I prefer orange because its easy to make myself, and smells fresh.. plush no one seems to smell enough like oranges these days!
    5. Throw the soap soup and rest of ingredients into the bucket - mix thoroughly and wait about 24 hours.
    6. BA-DA-BOOM - DETERGENT! I filled old detergent bottles that Ive been saving up with this concoction and its pretty amazing! Im very satisfied with myself! I love when a project comes together and I can have a little more pride in my home care abilities!

    Monday, August 26, 2013

    Sick of running out of appliance soaps?

    Need to do dishes or wash your clothes but you just ran our of detergent? Gosh thats annoying. Especially when youre broke, or too lazy to go to the store, or its too late at night...

    Keep some Borax, washing soda, and vinegar (If youve read any other posts in this blog you probably aready have a lifetime supply of vinegar just waiting to be used in so many ways!) around!

    Now some other ingredients are super handy, but not ENTIRELY necessary in a pinch.

    Dishwashing detergent: (remember you can make as much of this as you want)
    1 cup borax
    1 cup washing soda
    1/2 cup salt
    1 tbl citric acid, unsweetened lemon kool-aid, or 20 drops lemon essential oil.

    Put vinegar in your rinse aid/jet dry dispenser... or you could just throw it in the bottom of the dishwasher.

    For laundry detergent you should get ready to make BIG batches. THIS WEBSITE does a FABULOUS job going into detail about how much you'll same, how the quality is, and more.
    As a sneak peak youll need the following for that recipe:
    1 cup washing soda
    1/2 cup borax
    1 bar soap (You should go to the cleaning isle of your grocery store and get a NAPTHA bar of soap. Its CHEAP and the most natural.)
    Approximately 3 gallons water

    *ALSO ABOUT THE ABOVE LINK*'
    You can make this recipe a powder (skip the water) if you prefer prefer powdered detergent... same recipe as above except leave out the water. No cooking necessary. Grate the soap, mix in the washing soda and borax, then grind it in a food processor).

    Vinegar can also be tossed in there as a fabric softener!

    Friday, March 8, 2013

    Peroxide and dish soap carpet cleaner

    This is just a simple little post to tell you about a miracle in carpet cleaning... a "middle of the week treat" if you like.

    Peroxide and dish soap.. that is all. Put some dish soap (not too much) in a bowl, then some peroxide and a bunch of water, mix well... pour on your carpet then scrub with a dish brush or something of the like. Its amazing, it disappears in front of your eyes like OxyClean!

    Tuesday, January 15, 2013

    Removing Sharpie from.. EVERYTHING

    I dont know about you, but this has been the bane of my existence lately. My 2 year old seems to keep finding sharpies I didnt even know we owned..


    Every color of these permanent pens have been on every surface of my house (and some places they are still there since there has been a lack of rubbing alcohol around..) So I have had 6 months to a year of experience trying EVERY TIP on the internet to figure out how to remedy my counters, closet doors, walls, cabinets, and even tile of my childs artistic expression.

    I was really sick of EVERYTHING on the internet saying "Mr. Clean magic eraser" because I'm a holistic person, I like to Do It Myself.. and I just don't always have one around, nor the money to always have them around... so here is my gift to you!

    Here's whats been working:
    1. Clothes – hand sanitizer
    2. Walls - toothpaste or hairspray (be gentle so the paint doesnt come off!)
    3. Carpet  – white vinegar, or Dish soap mixed with peroxide.
    4. Wood (and closet doors)  – rubbing alcohol, and sometimes toothpaste depending on the wood finish.
    5. Cabinets (Mine are coated with that fake wood surface stuff...) - The ONLY thing that works is hand sanitizer!
    6. Tile - Hand sanitizer or hair spray.
    7. Dry erase boards - use dry erase marker, go over small sections, little by little and wipe off with paper towel.
    8. Leather - Spray sunscreen (*Ive heard. This one I haven't actually tried it. Please lemme know!)
    9. Plastic - Baby wipes! (Or dry erase marker) 
    **SUPER TIP**
     Dry erase marker will remove sharpie from PRETTY MUCH ANYTHING (anything that I have tried so far, anyways) Only it is a looooong slow process and uses up a lot of marker and towels. Its still pretty amazing and worth mentioning.
    This is a binder with a plastic insert cover with Sharpie that's been on it for months (and for some reason purple seems to be the hardest Sharpie color to get off)

    Just scribble Dry erase marker on, and wipe with a towel!
    MAGIC! 
    Uploaded from the Photobucket Android App

    Uploaded from the Photobucket Android App


    Uploaded from the Photobucket Android App

    WHEN ALL ELSE FAILED:
    Alright, I admit it - some of these didnt work for certain things - like for some reason my sons closet doors. I dont know if its the paint on it or what, but I just could get it at all. One day, like an angel, a family member that worked at Ace Hardware brought me a magical product that changed that - and it came in single serve packages. It still took elbow grease, but now Ive been using it to get rid of anything that any of the above didn;'t work on. I found on amazon you can get a big bucket of it, so I may have to invest! Its definitely worth it!

    Friday, August 3, 2012

    Household Management Book

     Around here I keep a LOT of lists. I clean a LOT, and I have a child to take care of. I decided to combine these things into one home made binder that me and the Boy dually use to manage cleaning, finances, health, and organization!


    When you make it Im sure you'll feel very Obsessive Compulsive as I did, but it does wonders for making progress in the home.

    What you'll need:
    *Sheet Protectors, Diamond Clear - 100 Count (V) -
    *Expo Dry Erase Markers - 18 ct. - Dry-Erase Markers (Used to write on the clear sheets to save work, ink, and paper!)
    *A 3 ring binder (not a super thin one, depending on how much you incorporate.)
    *A word processor on your computer. And a printer! (Leave a comment if you want me to email you the template for any of these pages!)
    *Section Dividers.


    SO far there are 4 sections, but its a work in progress.

    The Finance Section:


    This form just make sure that every thing gets paid every month and no bills get skipped.


     Debt repayment Page: The following page got a bit messed up because I didnt realize I didnt have any colored ink, so I just wrote it in.
    Write the minimum payment amount, how much you actually pay. Then you figure out (if you can afford it) a day that you would like the bill paid off by, divide total amount owed by the number of months that is, then you write down ho much you would have to pay in order to complete your goal.

    This is a great way to organize things, make getting out of debt more likely and easier to figure out. Its my way of figuring out how realistic financial goals are.

    The sections (If you cant read it) on the form from left to write are: "As of" Date. Type of payment. Minimum payment amount. Projected date/number of payments (based on min. payment.) Actual amount of money you pay monthly. Projected finish date (with the amount you actually pay - this can be hard if there is interest involved.) When do you WANT to have it paid by?  Amount of money needed in order to achieve this date. And the Number of payments that would be.

    The Food Section:
    I have a page like this for both Oliver and I. Of you wanted you could track exercises, too. I use my Android for that.

    On this page I make sure he is getting a rounded diet by having the checks in the end - Meat, Veg, Fruit, Beans, Nuts/Legumes, and grain. Theres no dairy because we dont eat dairy except occasional cheese, and you may want to put Sugar on there, too.


    The TO DO/Chores Section:

    This page is for long term stuff that doesnt need to be on the chore list but we need to do some time soon.


    This section is the only one I have in plastic sleeves.
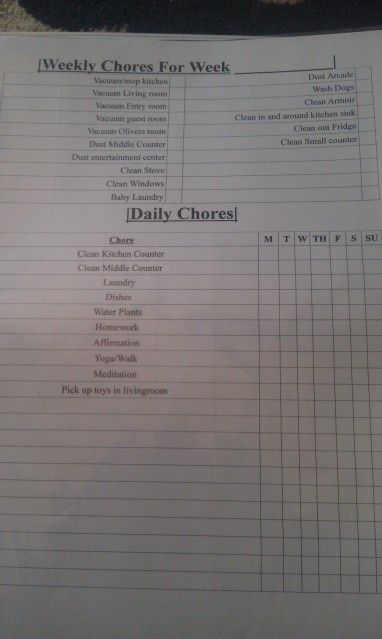
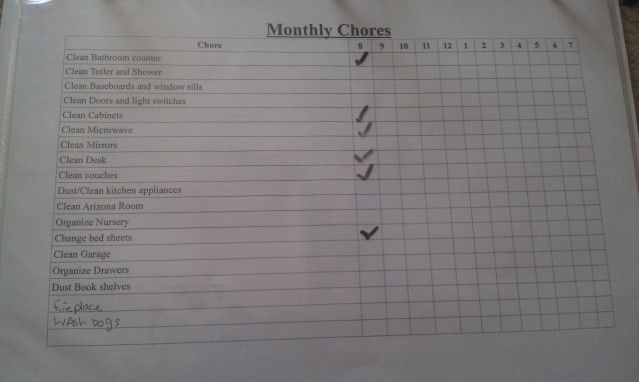
    Ok this may seem like over kill, but Ill explain why there are 3 chore lists in a minute. First look them over.
    Weekly Form. This way I can look over what I need to get done every week. Also, I dont "work" on weekends =)


    This one is both weekly and daily. Sometimes I have time to do extra chores and sometimes not enough. As long as its all done by Friday Im in the clear. This is so I can just check them all off. Just trust me, I had to do it this way from experience.


    Not everything needs to be done all of the time. These are things I get done when I have extra time, or something REALLY needs to get done. Itsthe lowest priority list.

    This above form I have been keeping on the fridge until Adam has been trained to look in the book. Its just man chores to remind him to keep busy as well.

    The Stuff Section:

    Things to save up for like large appliances, or even luxury items you really want go on this list:


    Eventually Ill make a lists section, but this is my bonus time funzies craft list! I made the table really thick so I can write all of the supplies in it.


    I hope you like it! Give me some feedback!

    Other ideas:

    A section just for all of my ridiculous lists.
    A list of peoples Birthdays, anniversaries, and interests (gift ideas) they have.
    FAVORITE family recipes as a quick reference when you arent sure what to go shopping for.

    I would LOVE to hear other ideas you guys may have for the book!

    Wednesday, July 18, 2012

    Dont waste those coffee grounds!

    I try to recycle or reuse anything that comes into my home, one thing that usually bothers me and that is a huge waste in most households is Coffee grounds!


    Here are a few ways you can use coffee grounds after youve drank up that coffee. Better than throwing things in the garbage, these ways might actually make your life easier!

    1. Skip the toxic abrasive cleaners for pots and pans and use a handful of coffee grounds instead.

    2. Scour (non-porcelain) sinks with coffee grounds. It can actually clean out your pipes with its course texture and inhibits odors.

    3. Clean old food off of dishes. Be aware not to use coffee grounds on materials that might be absorbent or porous so that you don’t end up with brown stains.

    4. Boiling water and coffee grounds help to get rid of stinky odors deep down in your drains!

    5. Out of Baking soda? (you should NEVER be!!!) Coffee grounds can also be used as a deodorizer. Place grounds in a jar or dish to absorb odors from refrigerators and freezers.

    6. Leave a dish of coffee grounds out to absorb odors in rooms that have an unpleasant odor. (the same goes for your car and your ashtrays!)

    7. Make a used coffee grounds sachet. Fill old nylons or cheescloth with dry used coffee grounds. Hang in closets to absorb odors.


    8. After you give your dog a bath, rub coffee grounds through the coat of your pet. Coffee grounds are said to repel fleas.

    9. Rub on hands to remove food prep odors.
    10. Use wet grounds when cleaning your fire place or wood stove to keep the dust and ash from flying.

    11. Get rid of Ants! Use coffee grounds for natural ant control. Place dried grounds in the areas ants frequent. The smell is a deterrent.

    12.  Grow mushrooms on old coffee grounds.

    13. Cover up scratches in furniture. Dab a strong solution of coffee onto the scratch. Naturally, this works best on darker woods.

    14. Use coffee grounds as a non-toxic, fully degradable fertilizer. Coffee grounds are a good source of nitrogen, calcium, magnesium, potassium and other trace minerals. While you need to be aware that not all plants love coffee, such as tomatoes, most are enriched by the added nutrients. Be careful though - make sure you check the internet or some other source to make sure that where you live doesnt have naturally acidic soil - I live in Arizona where the ground is Naturally Alkaline, and Coffee REALLY peps up soil for plants!) This is especially helpful for plants such as roses that need a high adicidy.

    15. Your worms love coffee as much as we do. Theory suggests that besides the caffeine, the bacterium that grows on the many-sided grounds is not only a food source, but adds grit to their digestive system allowing them to digest better. Coffee-eating worms reproduce faster, which is great for oxygenating our gardens and compost.

    16. Use as a non-toxic bug repellant. Use a solution of coffee to spray your plants. The smell is too strong for most bugs.

    17. Use coffee grounds to keep cats from digging and pooping in your garden.

    18. Use coffee grounds to deter slugs and snails. Both the smell and the abrasive surface help keep these pests out of the garden.

    19. To increase your carrot harvest, mix the seeds with fresh-ground coffee before sowing. Not only does the extra bulk make the tiny seeds easier to sow, but the coffee aroma may repel root maggots and other pests. As an added bonus, the grounds will help add nutrients to the soil as they decompose around the plants.

    20. Kitty repellent. To keep kitty from using the garden as her personal powder room, sprinkle grounds mixed with orange peels around your plants.

    21Soften and add shine to hair. When washing your hair, rub coffee grounds through wet hair and rinse. For brown hair, coffee grounds add highlights.

    22. Use coffee grounds as an exfoliate for skin. Pat on skin, massage over skin, rinse.

    23. Add coffee grounds to your skin mask beauty routine. Put some wet grounds over dark circles around your eyes and watch that Vassal Constricting elixir erase them!

    24. Used grounds are also said to repel snails and slugs.

    25. Rub coffee grounds on hands to get rid of smells from chopping or cutting up pungent foods.
    26. Make a used coffee grounds sachet. Fill old nylons or cheescloth with dry used coffee grounds. Hang in closets to absorb odors.
    27. When you need an abrasive cleaner, coffee grounds can be used. Be careful of any surfaces that might stain.
    28. Remove furniture scratches with wet coffee grounds.
    29. Sprinkle wet coffee grounds over the ashes to keep from becoming engulfed in the plume of dust ashes create when you need to remove them.
    30. Dye fabric, paper or Easter eggs. Simply add used coffee grounds to warm water and let sit a bit to create a dye. 


    31. Cellulite reducer. Miix 1/4 cup warm, used coffee grounds with 1 tablespoon of then, while standing over an old towel or newspaper, we're to apply the mixture to our "problem areas". Then wrap the areas with shrink wrap and leave on for several minutes. Unwind the wrap, brush loose grounds off our skin and then shower with warm water. For best results, it is recommended to repeat this procedure twice a week. A little weird to be sure, but as high priced cellulite creams actually have coffee in them, it just might work.

    32. The acid in coffee actually melts ice a lot like salt.

    33. Use it in ashtrays. It keeps the odor of cigs out and puts them out for ya like the sand in public ashtrays!

    Thursday, February 9, 2012

    Drain Cleaner

    Remember when you were little and you (or a class mate) did a science project where a volcano is created from normal homemade science? Imagine what that simple little chemistry experiment can do in areas of your home!

    If you have a clog in your drain, or its simply just dirty in there try the following.

    Ingredients:
    Baking Soda or Borax
    White vinegar
    Salt (optional)

    Take about half a cup of baking soda and about a tablespoon of normal table salt (it doesnt matter if its iodized or not) and pour it down your drain. Make sure it gets in there - in case its clogged and water is backing up just make sure it settles or gets as far in there as you can. It may actually help to try and plunge the drain first to make sure you can get it down there.
    Next pour about half a cup of vinegar down after it.
    Now enjoy the fizzy fun!

    After the fizzing stops if no water has gone down or you aren't satisfied with the results pour a little extra vinegar down there. Now this time when the fizzy fun stops run the hot water down the drain.

    Everything should be broken up and your drain should be sparkling inside! Congrats, you just saved about 10 bucks by doing it yourself instead of buying Drain-o!

    Friday, February 3, 2012

    Amazing uses for coconut oil

    Traditional Indian Medicinal systems coconut oil is cited as a huge positive for your body. The biggest benefit of Coconut is Lauric Acid. Lauric acid has been found to increase total cholesterol the most of all fatty acids. But most of the increase is attributable to an increase in high-density lipoprotein (HDL) "good" cholesterol. As a result, lauric acid has "a more favorable effect on total HDL cholesterol than any other fatty acid, either saturated or unsaturated," a lower total/HDL cholesterol ratio suggests a decrease in atherosclerotic risk. It even helps with the effects of AIDS, as well as fightin the HIV virus.


    Besides ingesting it, there are a ton of other uses. I actually found the following list of 80 uses here: http://healthimpactnews.com/2011/80-uses-for-coconut-oil/


    80 Uses for Coconut Oil
    Personal Hygiene/Body
    1.       Moisturizer – simply scoop some out of the jar and apply all over your body, including neck and face.
    2.       Eye cream – apply under the eyes to reduce puffiness, bags, and wrinkles. Use on the lids in the evening.
    3.       Preshave – coconut oil will prep skin for the pending damage caused by shaving.
    4.       Aftershave – coconut oil will help heal your skin after shaving without clogging pores.
    5.       Deodorant – coconut oil alone can be used as a deodorant, but even more effective in combination with cornstarch/arrowroot powder and baking soda!
    6.       Hair Conditioner/Deep Treatment – use as a leave in hair conditioner by applying a teaspoon of coconut oil to your ends and then running your fingers through your hair to distribute the rest! For a deeper treatment, rub in a tablespoon of coconut oil onto your dry scalp and gently work through to the ends. Put a shower cap on to prevent transfer onto bed linens and leave on overnight.
    7.       Hair Gel/Defrizzer – rub a little between your palms and either scrunch into hair (for curly hair) or finger comb in through from scalp to ends (for wavy/straight hair).
    8.       Toothpaste – there are numerous recipes out there but I just mix coconut oil and baking soda and dab a little of the mix on my toothbrush.
    9.       Make up remover – use a cotton swab and a dab of coconut oil and you would be amazed at how well it works!
    10.   Chapstick – just rub a little into lips and it not only acts as a softening agent but it also has an SPF of about 4 so you get a little protection!
    11.   Massage Oil – pretty simple; grab some and rub!
    12.   Lubricant – it is an all natural, perfectly safe personal lubricant. Not compatible with latex!
    13.   Sunscreen – see my post on natural sunscreen for more detailed information.
    14.   Stretch Mark Cream – coconut oil is great at nourishing damaged skin. It may not be the magic stretch mark cure but it will help.
    15.   Nipple Cream – works great to nourish cracked, sore, or dry nipples. Apply to a cotton ball and leave on your nipples between feedings.
    16.   Diaper salve – very comforting on a rashy bum with no harsh chemicals. Also safe for cloth diapers.
    17.   Cradle cap – having issues with dry skin on your baby’s scalp? Coconut oil will not only nourish your baby’s skin, it also helps eliminate cradle cap. Just rub a teaspoon onto scalp daily.
    18.   Body scrub – mix coconut oil and sugar together and rub all over! Rinse off and your skin will be super soft! You can add in essential oils if you would like a specific smell.
    19.   Healing – when applied on scrapes and cuts, coconut oil forms a thin, chemical layer which protects the wound from outside dust, bacteria and virus. Coconut oil speeds up the healing process of bruises by repairing damaged tissues. Plus, it smells a heck-of-a-lot better than anything from the pharmacy.
    20.   Bug Bites – when applied directly to a bug bite, coconut oil can stop the itching and burning sensation as well as hasten the healing process.
    21.   Skin problems – coconut oil relieves skin problems such as psoriasis, dermatitis, and eczema.
    22.   Swimmers Ear – mix garlic oil and coconut oil and put a few drops in affected ear for about 10 minutes. Do this 2-3 times a day and it usually works within one or two days.
    General Health and Wellness
    23.   Stress Relief – relieve mental fatigue by applying coconut oil to the head in a circular, massaging motion. The natural aroma of coconuts is extremely soothing thus helping to lower your stress level.
    24.   Digestion – the saturated fats in coconut oil have anti-bacterial properties that help control, parasites, and fungi that cause indigestion and other digestion related problems such as irritable bowel syndrome. The fat in coconut oil also aids in the absorption of vitamins, minerals and amino acids, making you healthier all around.
    25.   Fitness – coconut oil has been proven to stimulate your metabolism, improve thyroid function, and escalate energy levels, all of which help decrease your unwanted fat, while increasing muscle.
    26.   Nose bleeds – coconut oil can prevent nose bleeding that is caused by sensitivity to weather such as extreme hotness and extreme coldness. This condition happens when the nasal passages become dry because of cold or dry air resulting to burns and cracks in the mucus membranes so bleeding happens. To prevent this just put coconut oil in you nostrils. Coat your finger with coconut oil and then lie down and coat your finger inside your nose. Doing this will strengthen and protect the capillaries in the nasal passages. A Vitamin C supplement will also help prevent nose bleeding.
    27.   For breastfeeding moms, consuming 3 ½ tablespoons of coconut oil daily will enrich your milk supply.
    28.   Helps with weight loss & controlling cravings.
    29.   Helps keep blood sugar levels stable and/or helps with cravings in those with diabetes.
    Health Problems (that coconut oil is known for aiding, relieving, or even curing when taken internally)
    30.   Eczema – in addition to taking it internally, many have success applying it externally, some don’t
    31.   Skin problems
    32.   Toenail fungus
    33.   Hot flashes
    34.   Bleeding hemorrhoids (can also be applied externally twice a day)
    35.   HIV
    36.   Head lice
    37.   Improvements in menstruation regarding pain/cramps and heavy blood flow
    38.   Migraines (with regular use)
    39.   Mononucleosis
    40.   Parasites
    41.   Thrush
    42.   Relieve gallbladder pain
    43.   Has helped some people improve symptoms of an underactive thyroid gland, results have shown subsequent thyroid blood tests becoming normal
    44.   Energy boost
    45.   Flaky, dry skin
    46.   May relieve acid reflux and indigestion when taken with each meal
    47.   Adrenal fatigue
    48.   Alzheimers
    49.   H. pylori
    50.   Candida albicans
    51.   Asthma, even in children
    52.   Autism
    53.   Cholesterol – improves HDL (‘good’ cholesterol) to HDL (‘bad’ cholesterol) ratio in people with high cholesterol
    54.   Chronic fatigue
    55.   Circulation/feeling cold all the time
    56.   Stronger immune system
    57.   Mental Clarity
    58.   Depression
    59.   Helps with inflammation in Crohns
    Health Problems (that coconut oil is known for aiding, relieving, or even curing when applied topically)
    60.   Athletes foot
    61.   Back pain/sore muscles
    62.   Canker sores
    63.   Acne
    64.   Cellulite
    65.   Herpes (applied topically and taken internally)
    66.   Genital warts (through topical application over 6 weeks, and coconut oil enemas twice a day depending on the location of the warts)
    67.   Circumcision healing – although I am personally against circumcision, I have read that coconut oil is a really great healer for this.
    Cooking
    68.   Use 1 cup to 1 cup ratio when replacing other oils/butter in recipes with coconut oil.
    69.   Replacement for butter/lard/Crisco/PAM in it’s solid form – greasing pans, pie crusts, etc.
    70.   Replacement for various oils in liquid form – baking, cooking, sautéing, etc.
    71.   Nutritional supplement – melt and add to smoothies.
    Other Uses
    72.   Insect repellent – mix coconut oil with peppermint oil extract and rub it all over exposed skin. Keeps insects off better than anything with Deet! Tons safer too.
    73.   Great for dogs and cats for general wellness. Just add a teaspoon to their water bowl daily.
    74.   Goo Gone – just mix equal parts coconut oil and baking soda into a paste. Apply to the “sticky” area and let it set for a minute. Then scrub off with an old toothbrush or the scrubby side of a sponge.
    75.   Chewing Gum in Hair Remover – just rub some coconut oil over the stuck chewing gum, leave in for about 30 minutes, then roll the gum between your fingertip. Voila! It’s out!
    76.   Polish Furniture – coconut oil with a little bit of lemon juice to polish wood furniture. However, I recommend you test it first on a very small, unobtrusive part of your furniture to make sure it works the way you’d like.
    77.   Polishing Bronze – all you have to do is rub a little oil into a cotton towel and then wipe down the statue. It cleans and helps deepen the color of your bronze.
    78.   Seasoning animal hide drums
    79.   Seasoning cookware
    80.   Moisturizing and cleaning leather products


    ______________________________________________________________________

    It really does seem like a cure-all! Do you know of any other uses for coconut oil? lease leave some comments with your experiences involving this miraculous oil! I personally use it for a variety of things and hope to increase its uses in my own home. I use it to hold my hair instead of gel as well as repair it after I bleach it. I make deoderant with it and soon hope to start cooking with it!

    Even using coconut oil regularly in cooking can aid in melting away that cellulite! 

    Thursday, January 5, 2012

    Get rid of that dishwasher residue!

    I just learned this and thought I'd share since it involves my 2 most favoritest things in the world, Baking soda and Vinegar!

    I have a hard time with my dishwasher leaving dusty residue on my dishes, its really lame and makes me feel like I wasted resources by cleaning them since I just have to rinse them again.

    Well try this on a load and see if it works for you:
    fill the dishwasher (NOT TOO FULL, or the washer wont be able to do its job anyways) then sprinkle a little bit of baking soda on the inside of the door. Fill the rinser with vinegar, and put about half as much detergent in there than you normally do.

    And thats it! Let me know how this worked out for you! It worked for AWESOMELY, and I thought nothing could make that problem stop!

    Sunday, January 1, 2012

    Glass cleaner!

    One thing to always remember when going green is to ditch the paper towels! I HATE THEM. I seriously do. They are a total waste, and just dont make sense to me. I wish they would just stop making them. Ill rant more about our throwaway society later... I use cloth for everything. This is a thing I developed before the "green" movement or anything of the like. I just hate them. Through learned experience they were just a big waste of money, resources, and effort. *valley girl voice* Oh you know, and like.. they like kill trees.

    You know whats awesome for windows? Black and white newspaper! I scowered the internet and Google for a reason, but alas. All I can tell you is that Newspaper and Paper towels are cousins, and Paper towels are much younger. They were actually made as a response to how well newspaper cleans!

    It wouldnt defeat the purpose to buy a newspaper solely for the use of cleaning your windows and mirrors really, because HUNDREDS of newspapers that DONT get recycled or used on the bottom of bird cages end up getting wasted. Its pretty ridiculous how many they make. At my house we get the Sunday paper for coupons and job opportunities, so I use most of whats left for windows and mirrors, and recycle the rest. Even coupons I dont use I give or trade to friends.

    Enough about that poop, lets continue.
    Youre going to need:
    1/4C of My bestest friend Vinegar. Either Cider or White.
    1/4C Rubbing alcohol
    Newspaper, a soft cloth, or the LAST of your paper towels ;)
    1 Tbsp of baking sodas best friend, cornstarch
    2 c. warm water


    You can also throw a little lemon juice in there to make the house smell clean, and to dull out the vinegar smell. I'm pretty sure essential oils and other smelly things will be futile against the might of vinegar =) But the smell doesnt last long, and when you DO smell it just imagine you're in a completely sanitary, disinfected OASIS!

    Honestly I think this works better than glass cleaners you buy at the store, and after Candace taught me how to make Deoderant at home and bought a bunch of cornstarch I've become a huge fan of it for lots of things.

    *Tip: When you use it don't spray too much on or there will be a fog from the Cornstarch. Use a little and kind of buff it off with the newspaper.

    I found a sweet blog that actually breaks down the cost of this recipe! She also did a comparison of a few different recipes, naming the one that I use the BEST! I win, and so will you when you use this!
    From her site:
    1/4 c. vinegar = $0.20
    1/4 c. rubbing alcohol = $0.25
    1 Tbsp cornstarch = $0.03
    2 c. water = virtually free, except for the water bill part, so let’s say $0.000001
    Grand Total: $0.48
    For an entire bottle of glass cleaner.

    Check out her site HERE

    Friday, December 30, 2011

    Home made Dryer Sheets

    Please refer to my previous post on Homemade Air Refreshers for a full explanation as to why fabric softener is bad for your clothes! Ive been looking for natural alternatives, but the only ones Ive found require the use of hair conditioner, which is hit or miss depending on brands and mostly contain a ton of chemicals and oils. I'll get back to you on this

    To Make your own dryer sheets, however, I have a solution!

    Commercial dryer sheets contain a lot of "fragrance" chemicals that absorb into your body when you put your clothes on. The EPA has even classified a lot of them of cancer causing.. but to be fair what DOESNT cause cancer these days? Well thats actually why WE are here!

     I found this list HERE that shows you what the main chemicals are and what they do. (That website also has a list of green alternatives!)


    • ALPHA-TERPINEOL- Causes CNS (Central Nervous System) disorders and is highly irritating to mucus membranes.
    • BENZYL ACETATE- Carcinogenic (linked to pancreatic cancer).
    • BENZYL ALCOHOL- Causes CNS disorders. It is irritating to the upper respiratory tract” causing “headache, nausea, vomiting, dizziness, drop in blood pressure, CNS depression, and death in severe cases due to respiratory failure.
    • CAMPHOR- Causes CNS disorders.
    • CHLOROFORM- Toxic. It is an anesthetic and carcinogenic.
    • ETHYL ACETATE- Narcotic. This product is on the EPA’s Hazardous Waste list. Irritating to the eyes and respiratory tract.
    • LINALOOL- Narcotic. Causes DNS disorder, respiratory disturbances.
    • PENTANE-”Danger-Harmful if inhaled; extremely flammable.

    You'll see a lot of cancer and respiratory disorders on this list, which is upsetting as well as ironic because you just want your clothes to smell good, right? That smell is killing you? LAME!

    Heres a crafty recipe to make your own dryer sheets!
    You'll need your trusty essential oils of your preference and old clothes or cloth to cut up.
    Cut cotton cloth into small squares. Add a few drops of essential oil to the cloth and throw it in the dryer with your next load. They should last about 2 or 3 loads, each time adding 3 more drops of your favorite essential oil.
    Experiment with different smells, and enjoy!

    Its funzies because you know EXACTLY what you'll be wearing and what will be touching your skin. Have fun with it!

    Wednesday, December 28, 2011

    Homemade air refresher and smell buster

    There are a ton of recipes online for making your own homemade fabric refresher, but be careful of recipes that say to use fabric softener. This is what the cheap wanna-be-Febreeze brands will use (like the ones at the Dollar Store), and all it does it coat materials in a wax-like... ness with a lubricant that makes you THINK its softer. This over a long time can actually make your clothes degrade faster, and ruins towels by blocking absorption.

    Plus the ingredients are TOTALLY not "green." It contains several chemicals which have been linked to health problems such as Central nervous system disorders, Headaches, Nausea, Vomiting, Dizziness, Blood pressure reduction, Irritation to skin, mucus membranes and respiratory tract, and Pancreatic cancer.

    Febreeze itself is not only expensive, but let me explain how it works. Its main working ingredient is called Cyclodextrin which basically works as a sticky ring-like molecule actually made from (like pretty much everything else in the grocery store) CORN! Its not that it ISN'T technically "green" its what it actually does. When sprayed into the air the stickiness grabs on to odor molecules until its too heavy and falls to the ground. This grabs a bunch of smell gunk and leaves it firmly planted on your floors and in your carpet.

    Anything you introduce to the environment, no matter how "good" or "green" it is (I <3 you Baking soda!) will pretty much do the same thing, but thats why we vacuum our home, too.. RIGHT? :P BUT as the owner of a toddler I understand that there are some toys (talking stuffed animals as an example) that cant be laundered anyways. Plus these recipes are going to be cheaper, and more fun since you will be just so proud of yourself in the end for being Super House wife (whether or not you have a spouse) and you are just so crafty! Im already proud of you and your talents!

    *One VERY simple recipe is 1/2 Vodka and 1/2 Water - Plus whatever essential oil you'd like (Lavender is a great choice, and if you want that fresh clean smell go with some lemon juice!). If you like the smell of Tea Tree oil I would recommend that the most, since BOTH vodka and the Tea Tree will be disinfecting!


    *An Alternative to the last recipe is using white vinegar instead of Vodka!

    *Another recipe that is easy and completely green Is just baking soda and water! a tablespoon of baking soda to every cup or so of water and consider those smells absorbed!